Thursday, June 28, 2012

Studio Monitors - Why do you need them in your home studio

This is an interesting and much debated topic with about a million sites telling people what studio monitors are great to use in home studios and why. If all those were not enough to convince you.......I hope I can add the last bit of information that might sway you to purchasing a good studio monitor.

Are Studio Monitors Needed?

The answer, is a resounding yes. If you are remotely thinking of producing good music, studio monitors are a must.

There are multiple reasons for using studio monitors.
  • Getting Stereo Imaging done right.
  • Getting a good reference mix-down of your production
  • Fine tuning your master mix
Why are some speakers termed studio monitors while normal home audio speakers are not?
This is a tricky subject to tackle and irks many audiophiles and expensive system owners if one says a studio monitor plays material better than their 25,000$ system :)!
  • A studio monitor is specifically made to listen to music critically in a Studio environment. Here is the catch. By studio environment I mean a room that is acoustically close to dead, provides no unwanted reflections and has the user listening near field....around 2-5 feet or less from the speakers, most good sound engineers mix their song at a very low level. The speaker design is no frills and employs very good to excellent woofers, tweeters and amplifiers and the less is spent by the manufacturers on the exterior design of the box. The primary duty of the design is to provide as flat a response as possible from 20-20000hz for a near field listener so that he can mix down and master an audio track to the best effect.
  • A home audio speaker on the other hand, is designed to be more of an all-rounder. A lot of money goes into the cabinet, the wood used on the cabinet, the shape of the box, the finish etc. The drivers used are generally tweaked to provide optimal listener experience from 20-20000 in a non studio environment, example living room at a high level of volume and wide dispersion for covering a large listening area. The key here is non Studio environment, smaller home speakers and those of a HTIB (home theater in a box) use ported enclosures to deliver bass that the speaker cannot reproduce due to physical size. This ends up affecting the frequency curve and it is not very flat at the lower end. The bigger speakers have the opposite issue, there is too much going on in mid range and lower end, that some manufacturers employ very high quality crossovers and tweeters that can cut through and balance out the lower end and get the high end clarity that most of us crave.
Can you use a home speaker for mixing and creating your track? 
The answer is yes, they are speakers that produce audio aren't they! but wait.....there are a few gotchas you need to be worried about.

Home audio speakers end up tweaking certain frequencies due to their design for non studio use. When you mix using a home speaker, the mix is going to be affected by the design of the speaker, for example...
  • I use a brand X HTIB fronts for mixing an audio track. Since the speakers are physically small they have an exaggerated low end using ports, medium to very little top end due to low cost tweeters and pronounced mids.
  • When I do my mix, I will end up giving very little low end, comparatively more middle and provide even more highs to compensate for the speaker and get the sound I want from the song.
  • Guess what happens once I master the track and listen it on Brand Y, a large floor standing speaker with 8inch woofers. The track is going to sound shrill and have absolutely no body in it.
How do you avoid this?

Once you mix down on your speaker, listen to it using multiple set of speakers and compare how the sound translates on different systems against reference tracks.
During my early days as a producer, I did not have the money to spend on expensive speakers and I used to mix all the time using my Polk Audio R300speakers that i picked up for $49 each! 
One thing I did make sure was to have reference tracks. Listing a few of the finest music recording efforts done from all over the world in the recent times. I am sure there are many more recordings that you love and know the songs inside out, if so use them. They are priceless since they give you Tracks that have mixed using the best engineers and equipment out there.

1. Come Away With Me - Norah Jones (Jazz bass, vocals, Piano, balance)
2. Greatest Hits - Queen Greatest Hits (1992) (Rock guitars, Acoustic Drums, Vocals especially harmonies, Bass Guitar,  Balance)
3. The Dark Knight - Original Motion Picture Soundtrack - Hans Zimmer - Original Soundtracks (Orchestral Balancing, huge mixes with large dynamic ranges)
4. Imagine - Armin Van Buuren (Dance/Trance music)
5. Vande Mataram - Ar Rahman (Pop, Folk instruments, Percussion, Vocals, Ambience)
6. Rhythm & Romance - Kenny G (Jazz Instruments, Percussion mixing, Bass Guitar)

The Idea is to do an A&B comparison between your mix and a reference mix. just focus on one area at a time. Drums, Bass, Guitars and so on. using this method, you know you are comparing a very well mixed song on your speakers. And by doing this...you take on instrument at a time...example... your drums have the same impact/sound as the reference song at the same level then you are on the right track.


How to do it the right way

Invest in pair of decent monitors, I currently own M-Audio Studiophile AV40 powered monitors. Nothing fancy. I also run Bose Companion 2 Series II Multimedia Speaker System to quickly listen to my mix on a normal system and also do AB comparison with reference tracks. If my track does not have the same presence or impact as the reference tracks listed above on the Bose Companion 2..then I go back to the drawing board and mix down using my monitors again.

Invest in a good pair of Studio Headphones. In most cases the studio headphones are incredibly useful. My monitors have 4 inch woofers and can get only to a certain point in the bass. I will not get the full extent of the precise bass presence using the small sized woofers. I run Sony MDR-V6 Monitor Series Headphones with CCAW Voice Coil and Audio-Technica ATHM40FS Precision Studio Headphones for making fine tunes to the bass and the highs.


Master List

Ending this article by providing links to the top Monitors that are being used at studios all over the world, ranking them from bigger to smaller size. I am leaving out Genelec, Equator, Dynaudio and Adam Audio due to the very high cost of entry for these systems (750-1000$ minimum). If you have the money and also have an extremely well set up studio then go ahead and look at these brands.

8 inch woofer
  1. KRK VXT8 Activ
  2. KRK RP8G2 Rokit G2 8In Powered Studio Monitor
  3. Yamaha HS80M Studio Reference Monitor 
  4. Behringer Truth B3031A 2-Way Active Ribbon Studio Reference Monitor with Kevlar Woofer, Single Speaker
5-6.5 inch Woofer
  1. KRK RP5G2 Rokit G2 5In Powered Studio Monitor
  2. Behringer Truth B1030a High-Resolution, Active 2-Way Reference Studio Monitor  
  3. M-Audio BX5 D2 
  4. JBL LSR2325P Two-Way 5" Bi-Amplified Studio Monitor 
4 Inch Woofer
  1. M-Audio Studiophile AV 40 Powered Speakers 
  2. Fostex PM0.4 Powered Studio Monitors 
  3. Behringer MS16 Powered Studio Desktop Monitors


Friday, February 24, 2012

Creating Sounds using FL Styrus

In my previous tutorials I gave information on how to set up a basic home studio, creating beats and simple song structures on FL studio. Now lets dig a little bit deeper into one of FL studios most powerful weapons, the Styrus Synth.

Overview of the Styrus

Styrus is an hybrid synth which is able to FM, RM and subtractive synthesis. FM is frequency modulation, RM is ring modulation. I will not delve deeply on the concepts since they are time consuming and there is enough material out there in Google which you can find to explain the concepts.
Image-lines website has a wealth on information on Styrus and its features. You can access most of this information directly from the site above in the help section.

Background on Synthesis
Synthesis as process is taking ingredients and tweaking them so that you get something very new in the process. However it is not always easy, for example in the field of chemistry synthesis is very complicated, time consuming and sometimes not reproducible. Well that is chemistry and this is FL studio. the concept remains the same and good thing here is you can save your synthesized sound as a preset and with just one click get the same sound again for reuse or even more tweaking.

So what are the ingredients used in synthesizing a new sound.  first you need a source, some kind of a sound wave to start. It can be a sine, triangle, sawtooth or square. We will concentrate on sine waves. And to know how a sine wave acts read through the following for a refresher in how sound works. If you know what a sine wave is proceed straight into the synthesis part of the article.

Simple concept of how sound works.
Before we head into our example for reshaping sound where we will be manipulating a sine wave, a little background on what a sine wave is. The sine wave is the most basic wave. The most common shape that sound generally travels through air is the sine wave. The higher the frequency the shorter the wave, example of sounds in this category will be bells, cymbals, shrill voices etc, they tend to die down quicker. The lower the frequency the longer the wavelength. Example of these sounds will be drums, bass and the low strings in the string instruments, they tend to have a longer duration.

Example would be walking to a door of a dance club or a hall where loud music is playing, you will generally hear muffled drum or bass tones outside the door. This is because those waves are so huge (wavelength) and carry a lot of energy that they can reach outside the realm of the club. Once you open the door and walk towards a speaker, the bass might get more defined, but perceived loudness will remain the same or increase a little more, but the highs will start to get progressively louder closer to the speaker until they are almost near ear tearing levels close to the speaker where they are the most apparent.

Synthesizing an Ambient Beach Wave Sound using Styrus

I have used this sound in many of my compositions to add atmospheric effects. Its pretty cool if you get it right, and when you play with it after getting a decent sound, you can make even better effects.

To keep this example easy. Let us use a Sine wave as the original wave and start modulating it to get the sound we desire. There are bunch of modules in Styrus that you need to be aware of.  the main module shown below in the figure is where you change the shape, modulation, volume etc of the wave very easily and get a cool sounding patch. The areas where you would spend a lot of time tweaking the sound are highlighted in the picture below.

In the main module there is a separate module called unison. this is where you can add texture and depth to simple sounds. This is where i spend a lot of time starting with a sound, since the texture from some of the presets are amazing. The options for this module along with the unison effects can be accessed from the options menu on the Styrus main panel, the downward pointing triangle symbol just above the 6th operator in the operator window shown below.


Lets load the default patch on Styrus. When you open up Styrus it should automatically load a Styrus patch. It will sound somthing like a String synth. Just navigate to presets and choose Default patch.

Now click on OP1 and go and change the wave shape of the signal from a sine wave to the following wave shape. You can see that I have chosen the half wave and then changed the shape using the sliders to the right.


The next steps is to create Filters that are going to provide you the nice wind and sea sounds. Go to filter one and use a LP3 filter with the settings as shown below. Also the Envelope needs to be changed to something that has a slow attack and lot of sustain. Why is this, a sea wave coming towards you normally starts out slow and then begins to gain volume and finally dies down. The closest would be a string section. To get a similar envelope to a string section is easy since there is a preset built in FL for this. See the image below, it will show you how to get to the presets, clicking on the triangle button shown in the box will pop you a menu and the state file preset used in this example is Strings.fnv. I have not highlighted it below, but the knobs for the cut off, res, env and drive are left up to you. You can play with these to get the sound you want.


The final step is to get a little bit of wind noise and this is done using the OP1 output. Just increase/decrease the output of OP1 into the filter. This should generate the needed wind noise. The final patch should look something like this. Once you are done, go to the triangle next to Styrus and save your creation as a new preset for use later!


Whew!...and the final sound should be like the audio in this link.

Hope you had fun creating the sounds. More complex sounds are possible once you include all the operators and the filters. Styrus is a beast of a synthmaker!

Thursday, January 26, 2012

Making Bollywood Style Beats using FL Studio

In last FL studio post, I provided instructions on how to make a dance style beats which sound close to what LMFAO used in their Party rock anthem song.

This tutorial will be dealing with making a Bollywood style beat using Fl studio instruments. The entire process is shown in the video below. For the full guide continue reading the post.


Open a new FL studio project.
  • Add a Fruit Kick and two slayer patches to the template.
  • On the options menu, go to project settings and change the beat structure of the project to a 7 bar 8 beat pattern from the default 4/4 pattern. This is very important as most famous Bollywood tracks follow this pattern, used extensively when there is a Tabla involved in the track. Basically the count for the pattern will be a 3/4 + 4/4 ( 1 2 3 1 2 3 4). If what I have said does not make sense just use this count as a metronome when the kick track plays in the video above.
  • For one of the Fl Slayer patches, go to presets and choose the Auto Natural patch. On the mode select none. It should start sounding like a simple clean electric guitar.
  • For the other patch choose any Ebass from presets.
  • Make the patterns for each of the instrument as shown below.
        • Claps
        •  Hats

 
        •  Kicks


  • For the lead and bass track, its up to you to figure out what you want. Listen to my compositions in the video, they will give you lot of ideas to practice and come up with your own tunes for the beat pattern
  • Fl Slayer is a decent sounding guitar patch, but if you are looking for a better sound then invest in a good starter guitar and record it directly onto your system.

Have fun making some great sounding Indian style music with in built FL studio sounds. Next tutorial will feature tutorials on tweaking one of the most powerful FL patches called Styrus.

Thanks for reading. Please leave your comments if you liked the tutorial.

Monday, January 23, 2012

FL studio - Making Dance Beats from Party Rock Anthem - LMFAO

Party Rock Anthem from LMFAO was a viral hit, mostly due to the incredible sound of the track as well as the great video. See the official video below. Just pay close attention to the kicks and the beat pattern used in this track.


If you are music composer especially targeting younger audiences with the dance club type music, then the kick sound used in this track is awesome.

The following tutorial will guide you through simple steps on how to create such a cool sounding kick on FL studio with no external drum vsts.You will be using FL Kick, TS404, basic claps and hats for the beats. Finally you will get to hear your track and compare with the tracks I have posted at the end of the tutorial.
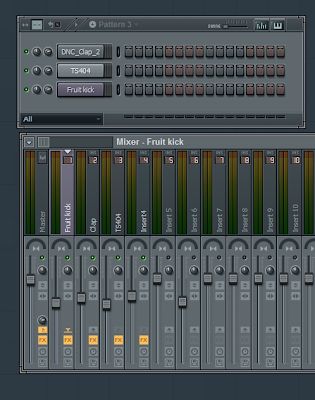
  • Open a new project. Add a Fruit Kick channel if you dont already have a kick in the list. Select/highlight the Fruit Kick channel. Press F9 to go to the mixer panel. Right click on Insert 1 and highlight the link selected channels to this track and send kicks to channel 1.
  • There should be a Clap channel, add that to insert 2.
  • Finally add a TS404 bassline synth to the plugin list and assign it to mixer insert 3.
At the end of it you should have something that looks like the following screenshot. Do not worry about the volume settings just yet, but you can use the settings below as I mastered my track with the volumes set as shown. Once you have got the project set up as so continue reading.

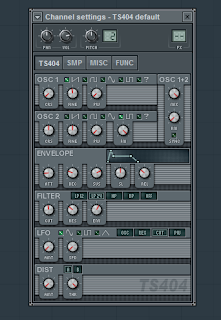
  • Click on the TS404 icon on the instrument/plugin view and you should see a window pop up. By default the window should show something like the following shot on the left. Tweak your setting as shown on the window on the right. You should hear a nice bass tone due to the sine wave mixed with the triangle and you should be able to only hear it as you approach lower notes such as C3 due to the envelope and filter settings used.
  •  Moving to the FX for this channel. Go to the Mixer by pressing F9. Then on the right hand side add a EQ2 and a Reverb effect using the drop down menu. Go ahead and try to mimic the settings below as close as possible. As an exercise you can by just tweaking these two be able to get many cool sounding effects for your bass synth.

  • Now go to channel 2 on the mixer which is the clap and add the following FX to it. I am using a compressor on the clap channel as the other two instruments are quick release with sustain instruments, needed the clap to release a little later and softer for the sound I was looking for.


Finally go to kick and use the EQ2 on the FX and have the following setting on it. I am cutting a lot of low energy below 40Hz to keep the kick tight and offset the low energy to the TS404.


With all this set up, the original song runs at around 130 bpm. so set up the master tempo to 130 BPM. Go ahead and make patterns with the following settings. A kick and the TS404 on every beat, clap on every second beat. For the Hats its just a normal closed hat on every beat and the open hat on half beat or the 1 - "and" - 2 part of the beat. You should end up with a pattern as shown below.
 The audio will sound like the following clips. I have included clips with and without effects on the channels just to show the difference. In future tutorials I will be posting on techniques to mix and balance instruments. Hope you had fun making the beats!
LMFAO Party Rock Anthem Tutorials by Kratos612

Sunday, January 22, 2012

Fl Studio Basics - Setting up a Home Studio

Fl Studio is a great tool for composers/music enthusiats and instrumentalists who are looking to get into the world of music production from your home. It has great features for making amazing sounding tracks. The major area where I feel it lacks is the recording part. Even there you could always use Edison (recording interface in FL studio) to record your vocals or instrument. It is just cumbersome and has a few steps involved to make it happen. I prefer the Ableton method of recording.

Still Fl studio is much lesser in price and when I started out making music covers and my own compositions, FL studio was the best software that I could afford along with all the other equipment needed for putting a home studio together.

However when it came to setting up my music studio I did not have a whole lot of places to get advice from, spent months talking to people and researching online on how to set up the ideal home studio. Even on youtube there would be videos, but people would not want to give clear directions on how to set up a home studio.

So for all of you out there that want to set up a good home studio, hope to help you avoid all the hard work and frustrations I went through by providing information through this article.

To get started using Fl Studio for your studio. Here are the basic tools you will need for sure.
  1. A good PC can be desktop/laptop - anything with at least 1.5-1.8Ghz of speed with at least 4GB of RAM will work. Remeber Fl studio only runs on windows, so you do not want to invest in a MAC if this is your choice of DAW.
  2. I upgraded the RAM on my PC with an 3GB kit giving a total of 6GB...I would recommend this is your planning on running a lot of VST instruments and using them during live performances. If you are just doing studio work, then you can get by with even 2GB RAM.There are few tricks to optimize FL studio for this. I will talk about those in later tutorials. Follow the link below to get the latest generation of laptops, even the cheapest one will be able to run FL studio fine. Make sure you do end up getting one with at least 500GB of hard disk space. Once you install all the VSTs and start making audio tracks in wav format....it is a given that you will start running out of space.
  3. Shop Amazon Computers - New Laptops for 2012
  4. FL Studio -- whichever version you can afford is good, the version shown below is great starting point and is powerful enough for you to make stunning tracks. I ended up with their producer edition with all tools. The fruity edition is also a good place to start if you are strapped for cash. You can always upgrade and build the instrument collection in FL from their website. They are very helpful and the other great thing is FLstudio offers lifetime updates. The links below show you the best versions of FL that are available now. The signature bundle is great and if your are a student you get it for an amazingly low price.
  5. If you have a laptop/desktop and do not have the space to put studio monitors I highly recommend investing money to get any one of the headphones listed below.
    1. Audio Technica Monitor headphones - ATH m40fs - I own these, swear by them, many of my youtube videos have been mixed using them. For example check the following songs out. Song 1 and Song 2.
    2. Audio Technica has also released an M35 headphones and looking at the specs for the headphone, they should work well too.
    1. Sony MDR-V6 - I own these too and they are industry standard along with the little more expensive Sony- MDR7506. The following songs were mixed using these Song 1 and Song 2
    2. Shure SRH 440 Pro - Heard it at my friends home and was very impressed.

Studio Monitors - No matter who tells you what,a good pair of studio monitors are a must in any home studio. It does not matter the size of the monitors you get, mostly depends on your ear and what feels good for you in the mid range and higher frequencies, mixing bass is a difficult thing in a home studio and you are better off using the headphones for that.
      M-Audio AV40 - I own these and do all my rough mixes on them, around 60 videos on my channel originated on these. They are very good with mid range and highs, but when it comes to mixing lows, you will need to use your headphones or get a subwoofer.


      Stepping up further, M-Audio B5 - don't own them...but have heard good things about
      them

The next piece of equipment that you will need will be an audio interface. For the longest time I used one of the Behringer usb based audio interfaces along with a 2 channel mixer. As time progressed I upgraded to a Tascam interface and a 10 channel mixer. I record Drums sometimes and need more than 6 channels. This will depend on you are set up and how much of recording you do. If you are just doing single channel of vocals, or instrument you could always go with the following products.

My very first setup which I highly recommend would be the combination of the following. A usb interface that will plug into the tape outs of a small mixer using a normal 2 channel RCA cable.


For the small mixer my choice would be the following product.


That should get you going very quickly, plus you will have good preamp on the mixer so the signal strength should be more than enough to the system.
For a one stop solution, you will need to spend a bit more and I can recommend the following devices.

Best - USB based entry level choices
M-Audio Fast Track - Entry level audio interface, they are excellent for smaller bands who can record tracks seperately.
Tascam US-100 - Another Entry level interface that has got great reviews. Again this will be one track at a time, or a vocal and an instrument together.


Final piece is a midi controller.

I am providing cheap controller options based on my experience, you can always research and invest in more powerful and expensive controller if you are at a intermediate or advanced user. If you are then I would think this article might not be for you in the first place :)! The following solutions from akai can be got together for less than 100$ and when working together, they form a very tight solution for all instruments and controls.Highly recommend this option since it will be much more portable for live performances too.


If you are a DJ, then go with a usb DJ interface. I am not an expert on those, so use the amazon search above and have fun finding the products that will fit your needs.
If you are more of a piano player then get yourself one of the bigger midi keyboards. I own an M-Audio Oxygen 49 and it has been working great for over 5 years now.


If you already own a entry level piano at home, good news you save some money.....I would suggest picking up the following device to hook your piano to the pc/mac. I run my entry level Yamaha PSR keyboard to my system using the EMU midi interface. There are other cheaper options available if you choose to go the non branded way.


My follow up post in the FL Studio basics will be how to work with midi and vsts to make a simple track.

Thanks for Reading!

You can check out my work here. I mostly do instrumental covers/ remixes of major songs from all around the world.
Disclaimer - These are products that I have used, am using or have seen in action. Just like any other review site, please read about the products before you purchase them. I am in no way affiliated to any of the product companies above or bear no responsibility if one of them does not work for you.